
How do I create a Smart Page in SendFox?
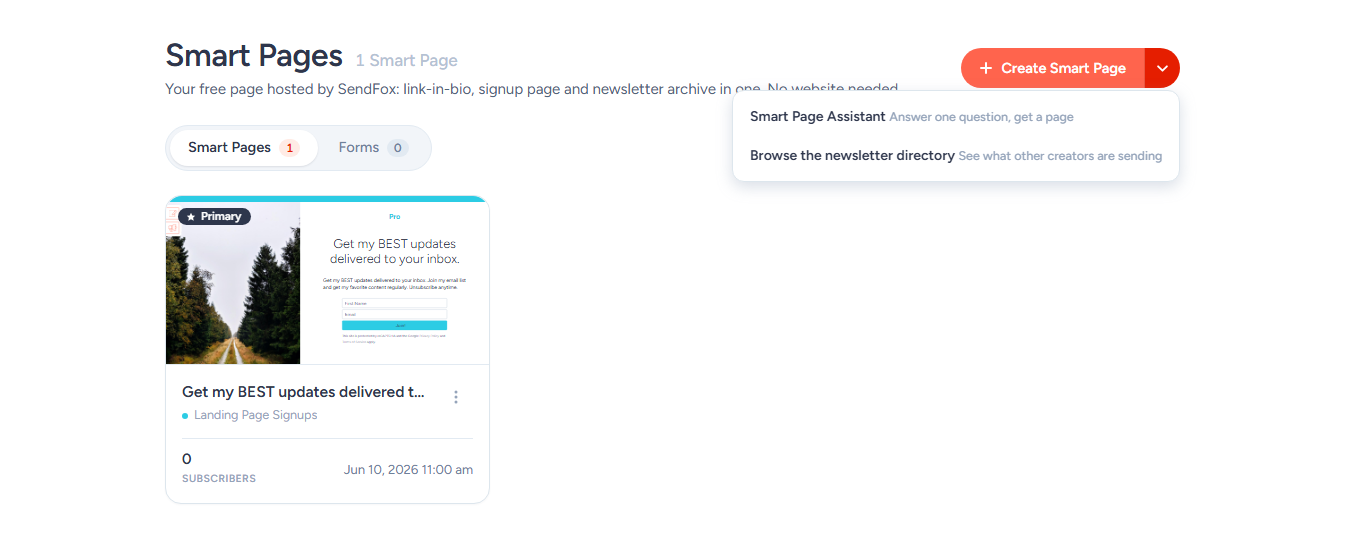
Go to Grow → All Smart Pages and click Create Smart Page to build a hosted signup page. Free accounts get one, made at signup; Lifetime and Pro are unlimited.
What is a Smart Page?
A Smart Page is a page SendFox hosts for you, with a built-in signup form that adds subscribers to the list you choose — no website needed. On the Free plan you get 1 Smart Page, and SendFox already made it for you when you signed up, so edit that page instead of creating one. Lifetime, Pro and Enterprise include unlimited Smart Pages; a custom domain needs Pro.
Starting a newsletter from scratch? See How do I start a newsletter with SendFox?
- Smart Pages live under Grow → All Smart Pages.
- Your starter page: every account begins with one Smart Page, made at signup and set as your Primary page, so it already answers at your custom URL (sendfox.com/yourname). Its Feed page is turned on.
- New pages open on a short quick setup — your address, the list signups join, and your headline and button text — so you can publish in a couple of steps. Everything else is behind Customize everything →, which opens the full editor: four tabs plus a live preview that updates as you type.
How do I create a Smart Page?
- Go to Grow → All Smart Pages and click Create Smart Page. (The small arrow next to the button offers two more ways to start: the Smart Page Assistant, which builds a starting page for you, and Browse the newsletter directory, which shows what other creators are sending.) On the Free plan your one page already exists, so you'll see Upgrade to create more Smart Pages instead; open your page with Edit in its ⋮ menu (see Troubleshooting).
- Name your page in the Page title field at the top of the builder (a new page starts as My Newsletter).
- Fill in the quick setup panel — your page address, Where do signups go? (a page won't publish until you pick a list), and the optional Make it yours theme, headline and button text — then either click Publish & get link to finish, or Customize everything → for the full editor.

- In the full editor, build your page with the four tabs on the left — Content, Design, Form, and Settings — while the live preview on the right updates as you type. Back to quick setup returns you to the short version at any point.
- Click Publish page when you're ready. On the Share your smart page screen, click Copy link to grab your live URL. Any later edits go live the moment you click Publish changes.
What can I change in the full editor?
Content
- Header: choose Your name or Your logo for the top of the page.
- Page copy: a Headline and a Body that tells visitors what they'll get when they subscribe.
- Page image: an optional image shown beside your copy and the form.
- Feed page: turn this on to publish your past emails as a blog under this page. Pick one or more tags under Include emails tagged — only sent emails with one of those tags appear on the page, so with no tags selected the feed stays empty. New pages start with Comments off; turn it on to let readers reply publicly under each post. You can also put a single email on your primary Smart Page's feed with the Publish to your Smart Page switch when you send it — see how to publish an email to the web and what the Enable Feed page feature does.

Design
- Themes: pick from eight ready-made looks, including dark backgrounds (Classic, Ink, Blush, Mint, Indigo, Slate, Paper, Teal).
- Colors: fine-tune the Accent and Background colors, or set a custom color.
- Type style: choose Modern sans or Editorial serif.

Form
- Fields to collect: email is always on; toggle on First name, Last name, and any of your custom contact fields.
- Button: set the signup button copy.
- GDPR consent checkbox: add an opt-in checkbox with your own consent text.
Settings
- Add signups to list: choose the list new subscribers join (a page won't publish until a list is selected).
- Redirect after signup: optionally send new subscribers to a URL of your choice.
- Page URL: your live SendFox address, with a Copy button once the page is published.
- Meta Pixel ID: add a pixel to track page views for your ad campaigns. (Not available on the Free plan — the field is disabled, with an upgrade prompt under it.)
How do I preview my Smart Page?
The preview pane on the right shows exactly what visitors will see and refreshes as you edit. Use the Desktop and Mobile toggles to check both layouts, and — if you turned on the feed — switch between the Landing and Feed views.
How do I share my Smart Page after publishing?
- Click Share (top of the builder) to reopen the share screen and copy your link — great for link-in-bio, social posts, and QR codes.
- Promote (in the ⋮ menu on each page on the Smart Pages list) gives you ideas and links for sharing your page.
- Newsletter directory: once your primary Smart Page has a title, a description and some activity, it’s listed in the public SendFox newsletter directory so readers can find you. To turn this off or pick a Directory category, go to Settings → Profile and use List my newsletter in the SendFox newsletter directory.
- Search engines: on the Free plan, your Smart Pages and feed pages are hidden from search engines such as Google. On Lifetime and Pro, they can be listed in search results.
- Make primary points your custom URL (sendfox.com/yourname) at that page — see how to change your primary Smart Page.
Can I put my Smart Page on my own domain?
Yes, on Pro: your primary Smart Page can load on a domain you own (for example, news.yourdomain.com) instead of a sendfox.com address. To compare tiers, see Which SendFox Pro tier should I choose? To connect your domain:
- Go to Settings → Sending → Smart page domain, enter your domain, and click Add domain.
- At your DNS provider, add the CNAME record SendFox shows you — it points your domain to
pages.sendfox.com. - Back in SendFox, click Verify. Once verified, your primary Smart Page loads on your domain. SendFox issues an SSL certificate automatically, so the first visit may take a few extra seconds.

Only your primary Smart Page is served on a custom domain — choose which page is primary with Make primary (see how to change your primary Smart Page).
Troubleshooting
Why do I see Upgrade to create more Smart Pages instead of Create Smart Page?
- The Free plan includes 1 Smart Page, and SendFox made it for you when you signed up. Edit that page (open it with Edit in its ⋮ menu on Grow → All Smart Pages), or delete it and create a new one. Cloning counts as a new page. For more pages, upgrade to Lifetime or Pro — see how to upgrade or downgrade your SendFox plan.
Why isn't my Smart Page collecting subscribers?
- Open the Settings tab in the editor and check that Add signups to list has a list selected.
Why is my Feed page empty?
- Only sent emails with one of the tags chosen under Include emails tagged (on the Content tab) appear on the Feed page. Add a tag there, or turn on Publish to your Smart Page when you send an email to put it on your primary page — see how to publish an email to the web.
Why can't I delete my Smart Page?
- A Smart Page that your paid newsletter uses (marked Paid on the Smart Pages list) can't be deleted. You can still edit it. See how paid newsletters work in SendFox.
Still stuck? Browse the SendFox Help Center or email support@sendfox.com.
Frequently Asked Questions
How many Smart Pages can I create?
One on the Free plan (SendFox makes it for you at signup); unlimited on Lifetime, Pro and Enterprise.
Why do I already have a Smart Page?
SendFox creates one when you sign up and makes it your primary page, so your custom URL works from day one. Edit it, or replace it with a new page.
What does the Smart Page Assistant do?
It asks one question, your website address, and builds a Smart Page from your site (choose I don’t have a website for a starter page instead), then opens the live page. Signups go to a new list it creates, which you can change under Add signups to list on the editor's Settings tab.
What's my page's address?
Every page gets its own SendFox URL, and your primary page also answers at your custom URL (sendfox.com/yourname) — set the custom URL under Settings → Profile. On Pro you can also connect your own domain.